Wednesday, September 30, 2009

Using Micro Set and Micro Sol

Hi all,
This week I decided to take some pics while I was applying transfers (decals) to my WB Terminators using Micro Set and Micro Sol from Microscale Industries and do a quick write up on how I use them.
I bought both of these a few years back. The purpose of them is to help the transfers stick and contour to non flat or irregular surfaces with no wrinkles and to give that "painted on" look, many professional Scale Modellars use both of these products and the finish is excellant. I'd figured if it's good enough for them it's good enough for my Word Bearers!!

The Micro Set (Blue) is the setter and the Micro Sol (Red) is the Softener. If you want a full description of how they work you can visit their web site for more details.


Microscale Industries ship all over the world without a problem, I had no problems when I bought mine direct from their web store (it can be tough to get these locally here in Oz).

Tools needed; Scissors, Scalpel, Tweezers, Gloss Varnish, Micro Set, Micro Sol, 3x Paint brushes (need to use seperate brushes for applying each of the products).

1. Gloss Varnish area transfer is being applied to. Transfers adhere to Gloss varnish better than any other surface. I would also apply the varnish the night before you want to apply the transfers, just to make sure the varnish is completely dry before you start.

2. Cut out the transfer from the sheet and then trim the excess film from the transfer. If you hold the transfer on an angle from a light source you will see the excess film, trim off the excess as best you can, but don't get stressed about it. Trimming the excess makes it easier to apply the transfer to small areas and makes it easier for the Micro Set and Sol to do their job. 


3. Dip the transfer into the Micro Set with tweezers and place immediately onto you cutting mat or tile (or whatever you use).


4. Brush on Micro Set onto the area where the transfer is being applied to, it doesn't need to be applied like a layer of paint so slap it on!!

5. Now check to see if the transfer is moveable on the backing paper (it only takes about 30secs), if it is it's time to apply the transfer. Using your tweezers to hold the backing paper in place on the area you wnat the transfer. Now use your brush with Micro Set on it to hold the tranfer in place while you slide the backing paper away, sometimes I had to use the back of the brush, this wont damage the transfer as long as your gentle with it.


6. Use more Micro Set to help position you tranfer if it's in the wrong spot. You will need to use plenty of it to flood the area the area again, but thats Ok as it doesn't damage the paint or transfer.

7. After a couple of minutes gently dab a tissue or napkin over the transfer, this helps to flatten out the transfer and gets rid of the excess Micro Set. It also helps the next stage.


8. Once you've applied the transfers to all the models your working on apply some Micro Sol. Let this dry over night. If there is still some wrinkling use some more Micro Sol until theyre gone.

9. You can now paint highlights or shade the transfer if you wish. Varnish the transfers at least once, you don't want these suckers to come off from wear and tear!!


The transfers have all been applied and a gloss varnish coated over the top of them


This isn't hard to do and the end result is a great finish!! I applied a Tactical Squad transfer to an Ultramrines shoulder pad on one of the bases and it looks like it's been painted on!! No wrinkles or scrunches! I'm very pleased with the end result. I'll make sure I take a close up photo of that shoulder pad as it's been Satin varnished, when I take the pics of the completed Terminator Sqd towrads the end of the week!

As usual if you have any questions or comments drop me a line...

Sunday, September 20, 2009

Army repairs and Varnish!!

Another post in a matter of days whats going on... HOBBY!!

A few weeks ago I was looking over my Word Bearers as I had finally decided to add Squad markings to them, as it's hard to distinguish the Squad's in the heat of battle. As I was applying the decals (I'll be doing a tutorial on this as I used some products I haven't used before so stay tuned...) I really started to notice the wear and tear this army has accumulated over the last 5(ish) years and I was bummed about it... I'd spent a lot of time and effort in making this army look really nice and I hated to see it diminished in any way. So I decided it was time for some repairs!! Over the last weeks or so I've re dry brushed all the metallic's on the back packs and any where else where it's showing wear and tear. I re glued weapons, broken conversions or anything else that's reared it's ugly head. So far this has been accomplished on my four CSM Squad's and the two Havok Squad's. These six Squad's have now also recieved their first coat's of varnish... ever... I've always been meaning to varnish these bad boys but you know stuff happens and it never came to fruition. Unfortunately that's why I've had to spend time these last weeks re painting metallic's, as dry brushed metallic's always wear exponentially quicker than any other colours (except for anything that's been painted over a white undercoat, they come off real fast!!). This is only something I've really become consciously aware of while working on my WB Terminators, the mithril silver drybrsuh was very lightly built up and until I'd given it a wash of the new GW washes it would come off with even light handling. Another problem I've had is that I apply another light drybrush of mithril once the wash has dried and this has also started to wear off with minimal handling already. So next time I've finished painting any metallic's I'm going to apply a varnish to seal it all in and hopefully a little more time spent here will save me a lot of time in the future with re painting whole sections of models. I've seen plenty of people have success and (lots of) failures with spay varnishes, so many years I'd decided spray varnishes were not the way to go (even though I hadn't varnished anything :-)). I'm not the only one who feels this way as Ron and the boys from FTW Bloggers Group have recently done an article titled Varnishing without Frosting.
Check out the link for their thoughts and ideas at;

Applying the varnish by brush does take a long time, but I'm very happy with the results. Overall I've used a Gloss varnish on all the armor and metallic's and then I've used a Satin varnish for flesh, standards, holsters, (im)purity seals and accessories. I didn't want to use a Matt Varnish as a Matt finish doesn't compliment and enhance a paint job like Gloss and Satin varnishes do. The Gloss varnish should give good protection to the high wear area's like the shoulder pads and power packs.
I've used Vallejo Model Colour varnishes for this project (See below pic)


On the hobby cards for this week I'm finalizing my decision on how I'm going to paint my Space Hulk Terminators and I'm currently doing the final touches on my Word Bearer Terminators, which is... Metallic's, Decals and Varnish!! As I stated earlier I'll be doing a tutorial on applying decals after I've finished the Terminators and I'll be sure to include the tricks I've picked up over the years in applying them.

PS: I've picked up a Cryxx battle group and a corresponding P3 paint set, once these have been built and painted I'll be sure to put up a post and review on how the P3 paints worked for me...

Friday, September 18, 2009

Magnetizing Weapons Options

Hi guys,

I've had a few friends ask me about how I magnetize my mini's and where I get the magnets from, so I thought I'd write up a summary of the way I've done it for my Word Bearers, this technique can be applied to any form of adding magnets to miniatures.

I get my Rare Earth Magnets from an ebay store: Frenergy Magnets. In the Store Category section, select the Discs option. They have various bundles with lots of different sizes. The ones I've used for this project are the 2mm(Width) x 1mm(Height/Depth). I find these to be the perfect size and strength for holding special weapons. For my Word Bearer Terminators I used 3mm x 2mm and I have some 5mm x 2mm I intend to use for vehicles and dreadnoughts.

Tools needed;
Hobby Knife, Pin Vice Drill, 1mm, 1.5mm and 2mm Drill bits, Super Glue, Marker pen and Magnets.

Process;
1; Mark on the mini where you want the magnet to go with your marker pen. I usually do this on the hand of the mini first, so I then know where I'll need the magnet on the weapon.

2; I then use the hobby knife to pre drill slightly the plastic where I've marked with the pen. I've found that if I don't do this my drill bit will slip slightyly from the intended place. In the pics you'll be able to spot the pre drilled with hobby knife and the one that wasn't.

3; I then drill with my pin vice a 1mm, then 1.5mm and finally 2mm holes. Again I've found that if I jump straight to 2mm I get tearing of the plastic. Even from 1mm to 2mm I get tearing so I include the 1.5mm into the process. It doesn't add too much extra time to the process and I like the results better because you get a nice clean hole and not a torn one.

4; I then mark the magnet, so i know what side is going into the hole. This helps to make sure the polarity of the magnets is correct for each weapon. Basically it means I can use any Special Weapon in any squad becasue all the magnet sides are aligned correctly for the whole army.

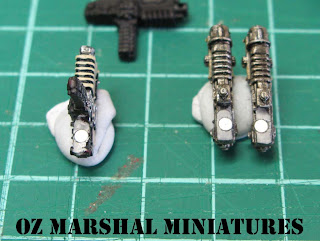
5; Apply the super glue to the hole. Now to get that little magnet into that little hole I attach the magnet to my hobby knife and because I've marked the magnet I know it's going in correctly. See pics below. Once the magnet is in the hole, I then slide the hobby knife away from the model so the magnet detaches itself nicely from the hobby knife and still stays in the hole. The other great reason for doing it this way is that the magnet sits flush with the top of the hole. I then quickly use a tissue to clean up any excess super glue.

Here's some pics of the process...


This isn't terribly hard to do, but it's great when it's done as it give you a huge amount of versatillity when it comes to weapon options. But I will stress that you need to double check that the magnet positioning is correct, because once they're in place with super glue, there's no way of getting them out again without destroying something, and it wont be the magnet that gets destroyed...

I've used this method to successfully magnetize an Imperial Fists Sergeant's weapons options too. So it can work on a variety of mini's

Please give this a go and let me if you've had success or any tips you've found to make this process better!!

Sunday, September 6, 2009

All your Space Hulks is mine!!


Space Hulk is BACK BABY!! I was never fortunate enough to own the original or it's supplement Deathwing when they were originally released. This is the game that started my addiction to GW games and the Deathwing expansion was the start of my love for the Dark Angels and the lore of the 40k universe. I played this many,many moons ago over at a friends place on a Saturday arvo listening to Soundgardens Badmotorfinger and Metallica's "Black" album ,1992 I think it was. So the release of the new box set has been a big trip down memory lane for me, especially reading the "Cleanse & Burn" mission battle report, this was a mission that we played heaps of for some reason... There would be 3 or 4 of us playing battling it out, so we didn't often play 1 vs 1 but more often 2 vs 1 or 2 vs 2, which was exciting as each of us had a different idea of what we needed to do to achieve the mission objectives, there were many a heated argument afterwards but after a few games we started working really well as pairs. So much so that the Space Marine players had to have further time restrictions in place when we pairing up!!


All this reminiscing has gotten me into a pickle though... Do I paint the new orgasmic Terminators in the Blood Angels colour scheme (it's OK they're a first founding chapter) or paint them up in Deathwing colour scheme? I can hear DT's screams now as he was the first person to teach me (repeatedly) how to paint up Deathwing Terminators way back when he was managing the Adelaide GW store when it first opened, I would terrorize him on most Saturdays... Ha,ha... It's not going to be too difficult to convert the Blood Angels into Deathwing, they do share a reasonable amount of iconography, what with both Chapters being "Angels of Death" and all...

So now I want your help in deciding the fate of my plastic Terminators I'll leave the poll open for 2 weeks!!